


How to Unbind and Fix iPhone 12-16 Pro Max Wi-Fi Issues in 2025?

Repairing Wi-Fi issues on iPhone 12 and newer models has long been a technical hurdle due to Apple’s parts pairing restrictions. Standard tools often fail to address activation or hardware mismatches. However, JCID Luban Technologies now leverages JCID Luban Technologies’ groundbreaking tools (iPhone WiFi chip and WiFi activation module) to simplify the process, enabling technicians to unbind, activate, and restore Wi-Fi functionality efficiently.
Core Tools & Methodology
The JCID WiFi Activation Module and P15 Programmer remain critical for success. This blog's approach mirrors JCID’s proven workflow but emphasizes precision and compliance. All tools mentioned are available at www.partsfixit.com.
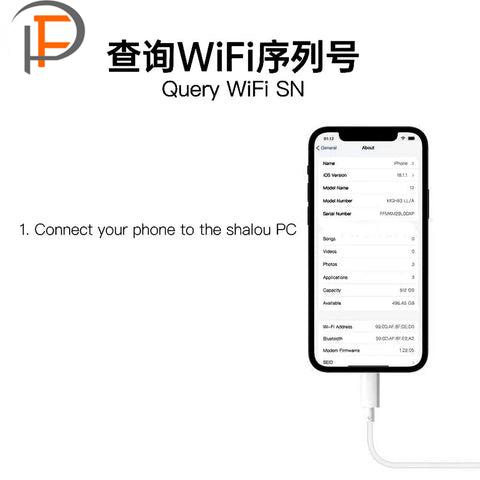
Step 1: Retrieve Original iPhone Wi-Fi SN
Let's prioritize identifying the original Wi-Fi serial number (SN).
Option 1: Connect the iPhone to the JCID Repair Assistant. If the activation certificate is recognized, proceed.
Two scenarios apply:
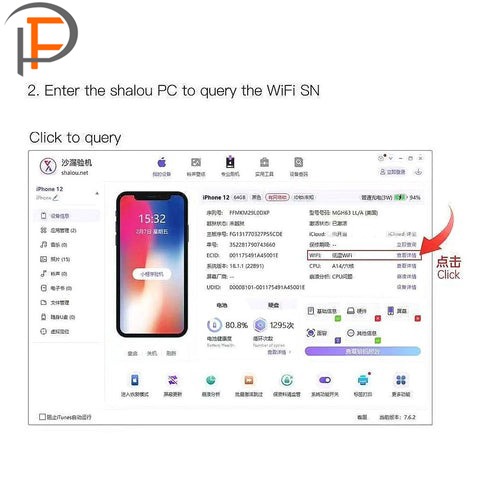
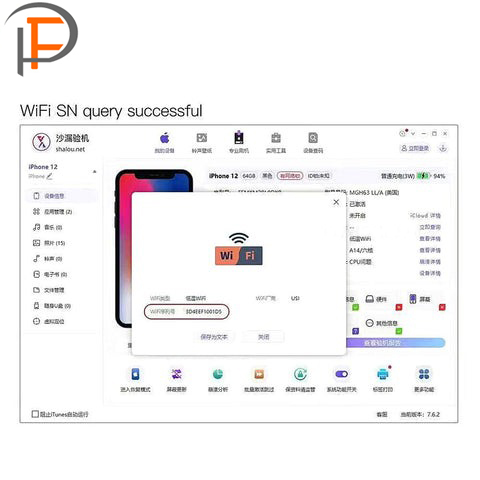
Scenario 1: Wifi SN Detectable via JCID Repair Assistant Or Flashing Software (iShalou, etc)
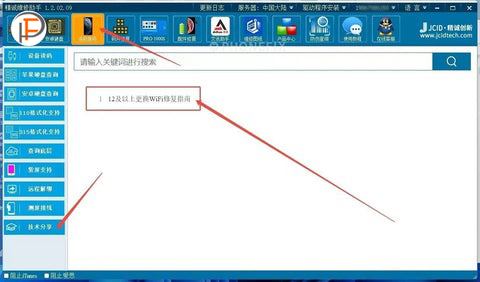
Option 2: Use flashing tools like iShalou to query the SN. Success allows progression; failure requires Scenario 2.
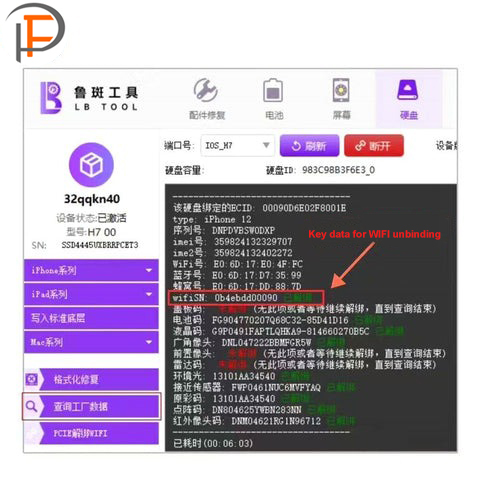
Scenario 2: SN Undetectable
Remove the iPhone’s NAND Flash chip. Use the JCID NAND Programmer with the “Query Factory Data” function to unbind and extract the SN.
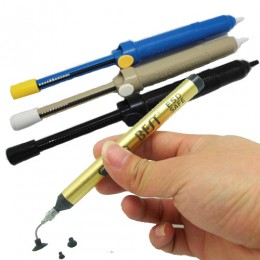
Step 2: Remove Faulty Wi-Fi Chip
Tools of Choice:
JCID Aixun 2nd Gen IC Chip Grinder: Precision-grind the damaged IC (recommended for accuracy) or Hot Air Gun + Pry Tools: Alternative for manual removal.
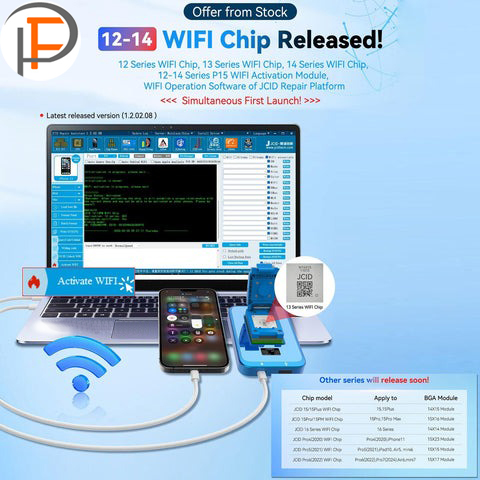
Step 3: Activate New Wi-Fi Module
Connect the iPhone to the P15 Programmer and a computer.
Insert the JCID Wi-Fi Chip into the Activation Module, then load both into the programmer.
Open JCID Repair Assistant and confirm device detection via connection P15 programmer. After successful connection, we see that the chip status is not activated.
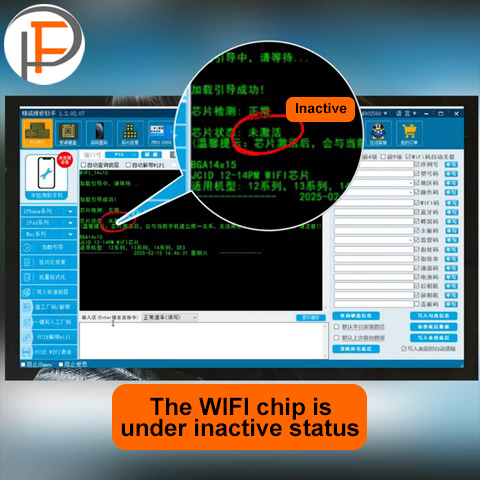
Click “PCIE Wi-Fi Activation” in the software. We see that the chip status is activated.
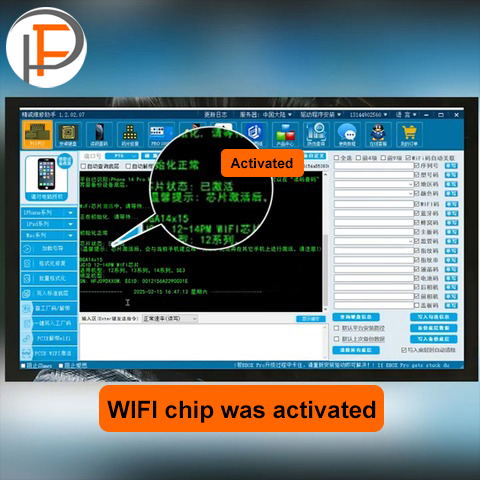
Once the chip status switches to “Activated,” install it on the motherboard.
Step 4: Functional Testing & Final Assembly
Pre-Installation Check: Use an iPhone Motherboard Test Fixture to validate cellular, Bluetooth, and power functions.
Reassembly: After confirming normal operation, reinstall the iPhone and verify Wi-Fi connectivity. The original SN and MAC address will remain intact.
32 Comment(s)
Our customers that come frequently may receive loyalty advantages such as special memberships, exclusive companion access, priority scheduling, and even discounts. These rewards express gratitude for continued patronage and improve the experience.
1
1
1
Escort in Shahdara services are easy to access, offering classy and passionate partners. Get top Shahdara Escorts who match your preferences and mood. For guaranteed satisfaction and safety, book through a trusted Shahdara Escorts Agency today.
1
1
1
Each option has its own advantages and drawbacks, and neither is inherently better than the other. The key is to understand your own emotional needs, lifestyle, and values, and to make a choice that aligns with your comfort and boundaries. Whether seeking solace in solitude or connection through companionship, the modern world offers a range of solutions to help individuals navigate their intimacy on their own terms.
1
1
1
In the international market, sexual health products are mainly sold through retail channels such as specialty stores, supermarkets, hypermarkets, mass markets, pharmacies and grocery stores. Manufacturers have been focusing heavily on low-cost production processes, which has exacerbated price wars among suppliers. The market faces the threat of penetration of inferior products.
1
1
1
The examples you provided add a real-world context to the concepts discussed. Thanks for making it relatable!
1
1
1
This looks fantastic and just suited. Every reasonable piece of information is prepared utilizing a lot of related facts to gain practical knowledge. Once more, I am really looking forward to this.
1
1
1
The way you connect [subject] to everyday experiences is brilliant. It makes the content more applicable and interesting.
1
1
1
1
1
An essay is a structured form of writing that transforms thoughts into coherent communication. It starts with an introduction that outlines the topic, followed by body paragraphs that support the thesis with evidence or examples. The conclusion summarizes the main points and leaves a lasting impression. Essays develop analytical skills, logical reasoning, and clear writing. They encourage reflection and creativity. Essays are valuable in both academic and professional settings, helping to communicate ideas effectively. By practicing essay writing, students and professionals improve their confidence, vocabulary, and clarity of thought. Essays remain one of the most effective forms of written expression.
1
Delta Airlines First Class Price offers a premium travel experience with spacious seating, up to 8 inches of extra legroom, and personalized service from a dedicated flight attendant. Passengers enjoy priority boarding, gourmet meals, complimentary beverages, and enhanced entertainment options. With Sky Priority® benefits and ergonomic amenities, Delta Airlines First Class Price ensures comfort and convenience from check-in to landing, making every mile of your journey feel luxurious
1
Explore the American Airlines Dublin Terminal at Dublin Airport for smooth arrivals and departures. Find terminal location, check-in counters, baggage services, and helpful tips to enhance your travel experience. Whether you're flying in or out, this guide covers everything you need to know about the American Airlines terminal at DUB.
1
'<a href="https://matuoi.com/">토토사이트</a>': 흔히 온라인 스포츠 베팅이나 다양한 미니 게임 등을 제공하는 플랫폼을 의미합니다. 많은 분들께서 즐거움을 위해 이용하시지만, 때로는 불법적인 운영이나 '먹튀(사기)'와 같은 위험에 노출될 수 있다는 우려도 있습니다.
Referral link ▷▶▷ https://matuoi.com
1
Amtrak Train Stations in Connecticut offer a reliable and comfortable way to travel to major cities across the Northeast. Whether you're planning a short trip or a longer journey, these well-connected stations are easy to find when searching for a train station near me. With clean facilities, friendly staff, and convenient schedules, Connecticut Amtrak Stations make train travel simple and stress-free. If your plans change, the Amtrak Cancellation Policy provides flexible options to modify or cancel your ticket. In case you misplace something during your trip, the Amtrak Lost and Found service is available to help you recover lost items. Choose Amtrak for a smooth, secure, and efficient travel experience.
1
1
1
I love how this post breaks down ideas so naturally! Reading this made me think of fashion pieces that carry culture and personality. One I recently found is the LA Dodgers X Mister Cartoon X Starter Satin Jacket on Vanson Jackets — a perfect mix of LA roots and premium satin comfort.
https://www.vansonjackets.com/product/la-dodgers-x-mister-cartoon-x-starter-satin-jacket/
I love how this post breaks down ideas so naturally! Reading this made me think of fashion pieces that carry culture and personality. One I recently found is the LA Dodgers X Mister Cartoon X Starter Satin Jacket on Vanson Jackets — a perfect mix of LA roots and premium satin comfort.
Helpful guide! Wi-Fi issues on newer iPhone models can be frustrating, especially when you rely on your phone for studying or work. It reminds me of how some students feel stuck with school tasks and start searching for “pay people to do your homework” because they think there’s no other way to manage everything. Just like Wi-Fi problems can be fixed with the right steps, homework stress can also be handled with proper support, clear explanations, and time-saving study tips—no shortcuts needed.
1
1
1
2025년에도 먹튀 걱정 없는 메이저사이트를 찾는 건 여전히 가장 중요한 요소입니다. 신뢰도 높은 메이저사이트는 오랜 운영 경력, 빠른 환전, 실사용자 후기를 기반으로 판단할 수 있습니다. 특히 커뮤니티에서 검증된 후기, 보증업체 제휴 여부, 실시간 고객센터 운영 등은 메이저사이트의 핵심 조건입니다. 무조건 광고로만 순위 매긴 곳보다 실 사용자들의 평가와 후기 데이터를 기반으로 한 메이저사이트 추천이 더욱 안전하며, 실제로 입소문 난 상위 10개 사이트를 기준으로 검증된 리스트를 확인하세요.
Referral link ▷▶▷ https://matuoi.com
Qatar Airways Lost and Found service helps passengers recover misplaced items during their journey. If you’ve lost belongings onboard, at the airport, or in a lounge, promptly contact Qatar Airways’ Lost and Found department or visit the airport’s lost property office. Provide flight details and item description for faster assistance. The airline prioritizes customer care, making the Qatar Airways Lost and Found process efficient and reliable for travelers worldwide.
???? 새로운 온라인 카지노 경험을 찾고 계신가요? ???? 저희 메이저놀이터에서 안전하고 신뢰할 수 있는 게임 환경을 만나보세요! 다양한 게임과 매력적인 보너스, 그리고 24시간 지원 서비스를 제공해 드립니다. 지금 바로 가입하고 흥미진진한 게임을 시작하세요! ???????? #메이저놀이터 #온라인카지노 #행운을잡아라
Referral link ▷▶▷ https://ajsl-man.com/
The Parke Hoodie stands out with its sleek silhouette and refined craftsmanship that instantly draws attention. Every stitch speaks quality, every detail adds character, and every wear makes you feel confident. It’s not just a hoodie it’s a statement piece built for people who love looking sharp with zero effort.
The premium Delhi Call Girls Service I used was excellent. The girl was polite, graceful, and made the entire experience smooth and delightful.
Your blog does such a great job spotlighting local dining options—really enjoy the clarity and helpful details you provide! Anyone who loves fresh, tasty crab dishes will find crab restaurants in hampton va to be a delicious and dependable choice.
The call girl service provided friendly communication calm atmosphere respectful behavior reliable coordination ensuring a comfortable pleasant overall experience today.
Bold. Stylish. Unforgettable the Rhude hoodie brings elite street wear vibes to your closet. Crafted with premium materials for unmatched feel and durability. Explore this must‑have essential on Arsenal Jackets and make your mark.
A well-managed Escort Service in RK Puram focuses on professionalism, reliability, and a refined approach to companionship.
Very engaging and easy to read article. The ideas are explained clearly which makes it useful for readers. While browsing about Call Girls in Delhi, your website appeared informative and trustworthy. Thank you for sharing.
When you choose a russian escort in delhi, the expertise behind the platform becomes clear through its smooth process. The booking steps are simple and easy to follow. This thoughtful structure helps users avoid confusion. Russian escort in delhi services focus on user convenience, encouraging bookings by offering a calm and efficient experience from beginning to end.
Experiencing Wi-Fi troubles on your iPhone 12 to 16 Pro Max in 2025? Apple's parts pairing can make fixing them tricky. Luckily, JCID Luban Technologies offers innovative tools for unbinding and activating Wi-Fi. Identifying your iPhone's original Wi-Fi serial number using the JCID Repair Assistant is key. While you troubleshoot, take a break and challenge yourself with the addictive Slope Game! Precision is vital, and these tools, available at partsfixit.com, can help restore your connection.
That's a really interesting breakdown of the Wi-Fi repair process! It sounds like those JCID tools are a game-changer for dealing with Apple's restrictions. Makes me think of other situations where specialized tools unlock hidden potential. Kind of like how I finally mastered those crazy slopes in Snow Rider 3D. It took the right strategies to really get good at it, you know? Finding the proper approach makes all the difference.
Leave a Comment